Introduction
The default Bash shell in Linux/older versions of MacOS is simple and minimalistic, but there is another alternative I recommend you try…
In this guide I will show you how to create a high quality shell environment using Oh My Zsh. Even if you don’t have Bash on your Linux or Mac computer, if you are looking for a boost to the look of your shell environment, I highly recommend you still go through this tutorial.
Install Zsh
First of all, install Zsh.
The steps for Ubuntu Linux, Fedora Linux, and MacOS are below.
On Ubuntu Linux, run the following command, and then enter your password to confirm:
sudo apt install zsh -y
On Fedora Linux, run the following command, and then enter your password to confirm:
sudo dnf install zsh -y
On MacOS, if you computer did not come preinstalled with Zsh, first install Homebrew. To do that, run the following command:
sh -c "$(curl -fsSL https://raw.githubusercontent.com/Homebrew/install/HEAD/install.sh)"
Now install Zsh using the brew command:
brew install zsh
Oh My Zsh and Powerlevel10k Setup
If you run the Zsh command, it looks quite plain, so let’s change that by installing Oh My Zsh (a Zsh customization framework) and Powerlevel10k (a Zsh Theme).
To install Oh My Zsh, run the following command in the terminal:
sh -c "$(curl -fsSL https://raw.githubusercontent.com/ohmyzsh/ohmyzsh/master/tools/install.sh)" "" --unattended
After the above command is complete, install the Meslo LGS Nerd Font TTFs (true type font files) for Powerlevel10k to make it look fancier when we install it. Here are the steps:
- Download the TTF files.
- For each TTF file, double click it and then a font manager will appear. Follow the prompts to install the TTF file.
Note: If you are using KDE with Wayland on Linux, you may need to install
gnome-font-viewerto install the fonts, sincekfontviewdoesn’t have complete support for Wayland yet, and may have errors reading the fonts.
Change your terminal’s font to MesloLGS NF by following the step below which corresponds to your platform. I have included Linux with KDE, Linux with Gnome, and MacOS. If you are using another platform, it is likely the steps are similar, for example it will probably be something like preferences followed by appearance .
For Linux using KDE, create a new terminal profile in Konsole, set it to the default profile, and then use this answer on fedoraforum.org to change the terminal font.
For Linux using Gnome, use this section of an official Gnome guide to set the font in Gnome terminal.
For MacOS, select your MacOS version, read the top text, and then scroll down to the font section on this offical Apple guide to change the terminal font.
After you have installed the fonts and set them up for the terminal, install Powerlevel10k using the following command:
git clone --depth=1 https://github.com/romkatv/powerlevel10k.git ${ZSH_CUSTOM:-$HOME/.oh-my-zsh/custom}/themes/powerlevel10k
Now change the value of "ZSH_THEME" in .zshrc to ZSH_THEME="powerlevel10k/powerlevel10k" using your text editor.
Now clone and install the ZSH syntax hightlighting plugin for great terminal syntax highlighting and the ZSH auto suggestions plugin for terminal auto completion. The code to clone both of these repositories is below.
# Syntax Highlighting`
git clone https://github.com/zsh-users/zsh-syntax-highlighting.git ${ZSH_CUSTOM:-~/.oh-my-zsh/custom}/plugins/zsh-syntax-highlighting

# Auto Completion
git clone https://github.com/zsh-users/zsh-autosuggestions ${ZSH_CUSTOM:-~/.oh-my-zsh/custom}/plugins/zsh-autosuggestions
Now, replace the line starting with plugins=() in .zshrc with plugins=( git zsh-syntax-highlighting zsh-autosuggestions ) , to enable syntax hightlighting and auto completion.
Launch zsh by running the zsh command.
When you launch zsh , your shell will look drastically different and colorful. This is a good sign because it means that Powerlevel10k is enabled.
Run the p10k configure command. You will be greeted with a configuration wizard. Answer the shape questions correctly. For example, if it says does this look like a diamond, answer “y” for yes or “n” for no if does not look like a diamond. After you have answered all the shape questions correctly, you can choose your prompt style and the level of minimalism you want through another series of questions. For example, one of the questions asks you whether you want to show the time on the terminal in 24-hour or 12-hour format, or not at all.
After you have answered all the questions, set the default shell to zsh using the following command and then enter your password to confirm:
chsh -s $(which zsh)
Now logout of your current desktop session or restart your computer and then launch terminal.
If you see the ZSH prompt you configured, you did everything correct and can enjoy your awesome new shell environment.
If you ever want to change the look of the prompt you configured, you can always run the p10k configure command like you did to originally configure your prompt, and the setup wizard will guide you through the process once again.
VS Code Configuration
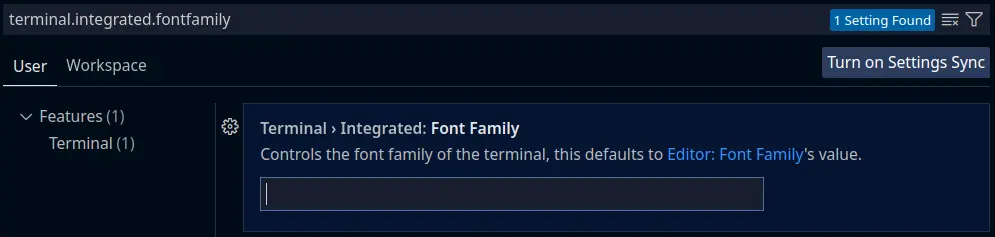
If you are using VS Code, the VS Code terminal will look empty without icons since the Meslo LGS Nerd Font is not used by default. To change the VS Code terminal font, open settings and type terminal.integrated.fontFamily into the search box. Change the blank value to “MesloLGS NF”. Now restart VS Code. Open terminal using CTRL-~ (Control-Tilde). You should see your customized ZSH shell with the icons. If it is not displaying correctly, you may need to run the p10k configure command again to reconfigure the prompt and enable the Meslo LGS Nerd Font.
Conclusion
Congratulations, you have just created a beautiful shell environment with Oh My Zsh!
Check back on TitusJTech and subscribe to my RSS feed to stay up to date on my latest tech articles, tutorials, and guides.